Project 2: CS61Classify
Deadline: Monday, July 15, 11:59:59 PM PT
In this project, you will write RISC-V assembly code to classify handwritten digits with a simple machine learning algorithm.
The goal of this project is to familiarize you with RISC-V, specifically calling convention, calling functions, using the heap, interacting with files, and writing some tests.
For Tasks 1-5, Lab 3 is required, and Lectures 6-8, Discussion 4-5, and Homework 3 are highly recommended.
For Tasks 6-9, Lab 4 is required, and Lectures 6-8, Discussion 4-5, and Homework 3 are highly recommended.
Checkpoint
If you receive a score of 30/100 (excluding points from the feedback form) or above by Monday, July 8th, 11:59 PM PT, we will award 0.5 extra credit points. The score is equivalent to finish tasks 1-5. This checkpoint is all-or-nothing, and you cannot apply slip days to it.
Debugging FAQ
Debugging Videos
Check out this playlist for videos demonstrating how to debug memory and calling convention issues! Please make sure you've watched these videos before coming to office hours or posting a question on Ed.
Common Errors
Restoring starter files and solutions to other project 2-specific errors are listed at the bottom of the common errors page.
Calling Convention Errors
Please read the calling convention guide appendix for more information on calling convention.
Office Hour Policy
Before coming to office hours, please make sure you have done the following:
- Add descriptions for each register in your functions to indicate their purpose ("this holds i" is too vague, please be as specific as possible so it is easier for us to read and comprehend your code.)
- Read the calling convention guide appendix.
- Use calling convention checker and resolve all calling convention errors caught by the checker (unless your question is specifically about how to fix these errors).
- Use memcheck and resolve all memory access errors (unless your question is specifically about how to fix these errors).
- Watch the debugging videos.
Make sure to fill out the template on the OH Queue with as much description as possible. Questions that do not use the template or have very low-effort descriptions (such as "it doesn't work") will be skipped/deleted.
Setup
You must complete this project on your local machine. See Lab 0 if you need to set up your local machine again.
Setup: Git
This assignment can be done alone or with a partner.
Warning: Once you create a group on Gradar, you will not be able to change (add, remove, or swap) partners for this project, so please be sure of your partner before starting the project. You must add your partner on both Gradar and to every Gradescope submission.
If there are extenuating circumstances that require a partner switch (e.g. your partner drops the class, your partner is unresponsive), please reach out to us privately.
-
Visit Gradar. Log in and register your Project 2 group (and add your partner, if you have one), then create a GitHub repo for you or your group. If you have a partner, one partner should create a group and invite the other partner to that repo. The other partner should accept the invite without creating their own group.
-
Clone the repository on your local machine (you don't need the hive machine at all for this project). Windows users should clone in Git Bash.
(replace su24-proj2-USERNAME with the name of your GitHub repo)
-
Navigate to your repository:
-
Add the starter repository as a remote:
-
Pull from the starter repo:
If you run into git issues, please check out the common errors page.
Setup: Java and Python
Make sure that you followed the local computer setup directions in Exercise 2 of Lab 0.
Setup: Venus
We will use the Venus web interface for debugging. The procedure is very similar to the Venus setup in Lab 3.
-
In the
61c-proj2directory, runbash test.sh download_toolsto download Venus for this project. (You only need to run this once.) -
On your local computer (not the hive), navigate to your
61c-proj2directory and run this command. Windows users should run outside WSL (Git Bash is recommended). -
In your web browser, open https://venus.cs61c.org (Chrome or Firefox is recommended). In the Venus web terminal, run
mount local vmfs. In your browser, you may see a prompt sayingKey has been shown in the Venus mount server! Please copy and paste it into here. You should be able to see a key (string of letters and numbers) in the most recent line of your local terminal output; copy and paste the key into the dialog. -
Now the project files from your local computer are loaded into the Venus web interface. In Venus, you can open the Files tab or run
ls vmfsin the Venus terminal to see all your files in your browser.
If you can see your files in Venus, you can skip the rest of this section. If the above steps didn't work, you can follow the guide below to manually upload files.
Manually Uploading Files
-
On your local computer or on the hive, zip your
src,tests, andtest-srcdirectories. -
Navigate to https://venus.cs61c.org Type
uploadin the Venus terminal. -
A file upload prompt should appear. Upload the zip file you created in step 1.
Now you can edit and debug your files on Venus.
To download any files you've edited, you can run zip zipname file1 file2 file3 in the Venus terminal. Replace zipname with whatever you want the downloaded zip file to be named. Replace file1 file2 file3 with a list of files or directories you want to download (there can be more or less than 3 files or directories).
In this part, you will implement a few math operations that will be used for classification later.
Before starting, please pull from the starter and update Venus.
Task 1: Absolute Value (Walkthrough)
To familiarize you with the workflow of this project, we will walk you through this task.
Running Tests
In this project, tests are written in Python and compiled into RISC-V assembly.
The Python source for the provided tests is located in unittests.py. Look over the contents of unittests.py. Although the tests are written for you in Tasks 1-4, it helps to be familiar with the unit testing framework to understand what the tests are doing.
To run the tests, on your local machine, start by running bash test.sh in the 61c-proj2 directory on your local machine. This gives you an overview of the commands you can run for testing. In particular, bash test.sh part_a compiles and runs all the tests for tasks 1-5. You can also provide the name of a specific function to compile and run all the tests for that particular function.
For this task, since we are implementing the abs function, on your local machine, run bash test.sh test_abs. This creates a test-src folder containing the Python tests compiled into RISC-V.
Since we haven't implemented the abs function yet, some of the tests are failing. Let's try implementing abs.
You can edit files in a text editor or directly in Venus. To edit files in Venus, switch to the Files tab. Here you can open and edit assembly files. Remember to save your files frequently with control+S (Windows) or command+S (Mac). Venus does not auto-save as you work.
Open src/abs.s (either in a text editor or Venus) and copy-paste the implementation below.
abs:
  # Load number from memory
  lw t0 0(a0)
  blt t0, zero, done

  # Negate a0
  sub t0, x0, t0

  # Store number back to memory
  sw t0 4(a0)

done:
  jr ra
Again on your local machine, run bash test.sh test_abs. The tests don't pass, so something is probably wrong with our implementation.
Using VDB to debug tests via Venus
First, open up Venus in your web browser and mount your files. (Refer back to the setup section of the spec if you're having trouble.)
Let's start by setting a breakpoint. Type ebreak at the start of the abs function. This places a breakpoint just before the blt t0, zero, done instruction.
To start the debugger, in the Venus terminal, run cd /vmfs/test-src and run ls. This should list all the test files you can run. Run vdb test_abs_one.s to start the debugger for an absolute value test.
In the Venus simulator tab, Click Run to start running the program. The debugger will pause at the breakpoint we set. While paused, you can inspect the registers and memory. In particular, notice that register a0 contains a large number here, because this test calls your function with argument a0 as a memory address. You can look use this number in the "Memory" tab of Venus to see the data stored at this memory address. We would recommend changing the display settings to "Hex".
You can also step through code line-by-line in the debugger. Click Step to execute the next instruction, blt t0, zero, done. Step through the function and inspect the registers. See if you can spot the bug in our implementation.
Click to reveal answer
In the first line, we're skipping the negation and branching to done if the number is less than 0. However, we actually want to skip the negation if the number is greater than and equal to 0, and perform the negation if the number is less than 0.
One way to fix this is to branch to done if the argument is greater than or equal to 0. Other ways to fix this are possible!
Change the implementation in src/abs.s to fix the bug. Run bash test.sh test_abs again, and you should see that 2 out of the 3 tests are passing now.
Using memcheck to debug tests via test.sh
In this project, you'll often run into situations where the logic of the code seems correct, but your tests are still failing. These errors are often caused by invalid memory accesses. This semester, we've introduced a new feature, memcheck, that should allow you to debug these errors easily, though please let course staff know on Ed if you run into any trouble using this feature!
Memcheck introduces two different flags you can add to your test.sh command: -mc for normal memcheck, and -mcv for a more verbose version. Let's try using memcheck to see what's wrong with our code.
Run bash test.sh test_abs -mc, and you should see something similar to the following error in addition to the error messages you saw at the end of the last section:
[memcheck] Invalid memory access of size 4. Address 0x10000004 is 0 bytes after a block of size 4 in static.
        Program Counter: 0x00000044
        File: ../src/abs.s:23
        Instruction: sw t0 4(a0)
        Registers:
                              x1(ra)=0x0000000C   x2(sp)=0x7FFFFFF0   x3(gp)=0x10000000
          x4(tp)=0x00000000   x5(t0)=0x00000001   x6(t1)=0x00000000   x7(t2)=0x00000000
          x8(s0)=0x00000000   x9(s1)=0x00000000  x10(a0)=0x10000000  x11(a1)=0x00000000
         x12(a2)=0x00000000  x13(a3)=0x00000000  x14(a4)=0x00000000  x15(a5)=0x00000000
         x16(a6)=0x00000000  x17(a7)=0x00000000  x18(s2)=0x00000000  x19(s3)=0x00000000
         x20(s4)=0x00000000  x21(s5)=0x00000000  x22(s6)=0x00000000  x23(s7)=0x00000000
         x24(s8)=0x00000000  x25(s9)=0x00000000 x26(s10)=0x00000000 x27(s11)=0x00000000
         x28(t3)=0x00000000  x29(t4)=0x00000000  x30(t5)=0x00000000  x31(t6)=0x00000000
These errors are designed to be as similar to valgrind as possible. Try to use this error message to pinpoint where our illegal memory access is happening.
Click to reveal answer
In the fourth line of the output, it shows that this is caused by the sw t0 4(a0) instruction. Instead of offset 4, we should be writing to offset 0 in this line.
Change the implementation in src/abs.s to fix the bug. Run bash test.sh test_abs again, and you should be passing all of the test cases.
Task 2: ReLU
In this project, we will be working with integer arrays. Remember that the integers in an integer array are stored in a consecutive block of memory.
To pass an integer array as an argument, we will pass a pointer to the start of the integer array, and the number of elements in the array.

In this diagram, register a0 stores the first argument (the address of the start of the array). Register a1 stores the second argument (the number of integers in the array).
Conceptual Overview: ReLU
The ReLU function takes in an integer array and sets every negative value in the array to 0. Positive values in the array are unchanged. In other words, for each element x in the array, ReLU computes max(x, 0).
ReLU should modify the array in place. For example, if the above integer array is passed into ReLU, the result would be stored in the same place in memory:

Note that the negative values in the array were set to 0 in memory.
Your Task
Fill in the relu function in src/relu.s.
relu: Task 2. |
|||
| Arguments | a0 |
int * |
A pointer to the start of the integer array. |
a1 |
int |
The number of integers in the array. You can assume that this argument matches the actual length of the integer array. | |
| Return values | None | ||
If the input is malformed in the following ways, put the appropriate return code into a0 and run j exit to quit the program. (For example, if the length of the array is less than 1, run li a0 36 and j exit.)
| Return code | Exception |
| 36 | The length of the array is less than 1. |
Testing and debugging
To test your function, in your local terminal, run bash test.sh test_relu.
To debug your function, in your Venus terminal, run cd /vmfs/test-src, then run a VDB command to start the debugger:
vdb test_relu_standard.s
vdb test_relu_length_1.s
vdb test_relu_invalid_n.s
Here are some debugging tips that should apply to the entire project:
- If you see the error "You are attempting to edit the text of the program though the program is set to immutable at address 0x00000000!", this means that you are trying to write to memory address 0x00000000 (or whatever memory address you see in the error). This is probably happening because you're giving this address to a store instruction, which then tries to write to this address.
- If you see the error "label exit used but not defined" when starting the debugger, make sure that you're starting the debugger with the
vdbcommands above. Clicking "assemble and simulate from editor" will not work. - Unfortunately the local tests don't check for out-of-bounds memory accesses. If you ever encounter a failing test on the autograder, try making sure that your code never writes to memory outside of an array.
If your ReLU works locally but not on Gradescope, here are some edge cases we've seen that the local cases don't check. You can modify unittests.py to write your own tests for these cases!
- The local tests don't perform ReLU on larger numbers.
- Watch the debugging videos.
Task 3: Argmax
Conceptual Overview: Argmax
The argmax function takes in an integer array and returns the index of the largest element in the array. If multiple elements are tied as the largest element, return the smallest index.
For example, if the integer array [-6, -1, 6, 1] is passed into the argmax function, the output should be 2, because the largest integer (6) is located at index 2 in the array. If the integer array were instead [6, 1, 6, 1], then the output should be 0, because the largest integer (6) is first found at index 0.
Your Task
Fill in the argmax function in src/argmax.s.
argmax: Task 3. |
|||
| Arguments | a0 |
int * |
A pointer to the start of the integer array. |
a1 |
int |
The number of integers in the array. You can assume that this argument matches the actual length of the integer array. | |
| Return values | a0 |
int |
The index of the largest element. If the largest element appears multiple times, return the smallest index. |
If the input is malformed in the following ways, put the appropriate return code into a0 and run j exit to quit the program.
| Return code | Exception |
| 36 | The length of the array is less than 1. |
Testing and debugging
To test your function, in your local terminal, run bash test.sh test_argmax.
To debug your function, in your Venus terminal, run cd /vmfs/test-src, then run a VDB command to start the debugger:
vdb test_argmax_invalid_n.s
vdb test_argmax_length_1.s
vdb test_argmax_standard.s
If your argmax works locally but not on Gradescope, here are some edge cases we've seen that the local cases don't check. You can modify unittests.py to write your own tests for these cases!
- The local tests don't check that your code works if the largest element in the array is the last element of the array.
- The local tests don't check that your code works if the largest element appears more than once.
- Watch the debugging videos.
Task 4: Dot Product
Conceptual Overview: Dot Product
The dot product function takes in two integer arrays, multiplies the corresponding entries of the arrays together, and returns the sum of all the products.
For example, if these two integer arrays were passed into the dot product function, the function would return (1*6) + (2*1) + (3*6) + (4*1) + (5*6) + (6*1) + (7*6) + (8*1) + (9*6) = 170.

Conceptual Overview: Array Strides
Instead of iterating through every element of the array, what if we want to iterate through every other element, or every third element? To do this, we will define the stride of an array.
To iterate through an array with stride n, start at the beginning of the array and only consider every nth element, skipping the elements in between.
Note that the stride is given in number of elements, not number of bytes. This means that iterating with stride 1 is equivalent to iterating through every element of the array.

For example, in the above diagram, both arrays are using stride 2, so we skip every other element in the array. 5 elements should be considered, so we stop after multiplying 5 pairs of elements together. The function would return (1*6) + (3*6) + (5*6) + (7*6) + (9*6) = 150.

In the above diagram, the first array is using stride 2, so we skip every other element in this array. The second array is using stride 3, so we use every third element in this array. 3 elements should be considered, so we stop after multiplying 3 pairs of elements together. The function would return (1*6) + (3*1) + (5*6) = 39.
Your Task
Fill in the dot function in src/dot.s.
The dot function may assume that the a2 argument for the number of elements to use in the calculation will not cause an out-of-bounds array access. However, you will need to enforce this when calling dot from other functions later in this project.
dot: Task 4. |
|||
| Arguments | a0 |
int * |
A pointer to the start of the first array. |
a1 |
int * |
A pointer to the start of the second array. | |
a2 |
int |
The number of elements to use in the calculation. | |
a3 |
int |
The stride of the first array. | |
a4 |
int |
The stride of the second array. | |
| Return values | a0 |
int |
The dot product of the two arrays, using the given number of elements and the given strides. |
If the input is malformed in the following ways, put the appropriate return code into a0 and run j exit to quit the program.
| Return code | Exception |
| 36 | The number of elements to use is less than 1. |
| 37 | The stride of either array is less than 1. |
Testing and debugging
To test your function, in your local terminal, run bash test.sh test_dot.
To debug your function, in your Venus terminal, run cd /vmfs/test-src, then run a VDB command to start the debugger:
vdb test_dot_length_1.s
vdb test_dot_length_error.s
vdb test_dot_length_error2.s
vdb test_dot_standard.s
vdb test_dot_stride.s
vdb test_dot_stride_error1.s
vdb test_dot_stride_error2.s
Also, check out the debugging videos!
Task 5: Testing
In this task, you will be writing tests for some mathematical functions that have already been implemented for you.
Conceptual Overview: Loss Functions
A loss function takes in two integer arrays and outputs an integer array containing some measure of how different each pair of corresponding entries are. Some loss functions also output the sum of all the difference measurements. This project uses three different loss functions.

The absolute loss function computes and outputs the absolute difference between each pair of corresponding entries, and then outputs the sum of all the absolute differences.

The squared loss function computes and outputs the square of the difference between each pair of corresponding entries, and then outputs the sum of all the squared differences.

The zero-one loss function computes whether each pair of corresponding entries is equal, and does not output any sum.

These loss functions use a helper function initialize-zero. It takes in the length of the array as input and outputs a newly-allocated array of the given length, filled with zeros.
Your Task
Fill in the tests for the three loss functions and the initialize-zero helper function in studenttests.py.
We recommend looking through unittests.py to understand how the Python framework for writing tests works.
To ensure that your tests are run by the unit testing framework, make sure that your function names start with test_! For example, the function def test_length_0(self) will run, but the function def length_0(self) will not run.
| Loss functions: Task 5. | |||
| Arguments | a0 |
int * |
A pointer to the start of the first input array. |
a1 |
int * |
A pointer to the start of the second input array. | |
a2 |
int |
The number of integers in the array. | |
a3 |
int * |
A pointer to the start of the output array, where the results will be stored. | |
| Return values | a0 |
int |
The sum of the elements in the output array. (No return value for zero-one loss.) |
initialize_zero: Task 5. |
|||
| Arguments | a0 |
int |
The size of the array to be created. |
| Return values | a0 |
int * |
A pointer to the newly-allocated array of zeros. |
The functions will return the following error codes if the input is malformed:
| Return code | Exception |
| 36 | The length of the array is less than 1. |
| 26 | malloc returns an error. |
To test your code coverage, run bash test.sh coverage. To get full credit on this part, make sure that your tests achieve 100% coverage. (In other words, your tests must cause every line of the implementation to be executed.)
Task 6: Matrix Multiplication
In tasks 6 to 9, you will implement a matrix multiplication function and file operations to read pictures of handwritten digits. Then you will use your math functions from the previous part to determine what digit is in the picture.
If you are curious how the machine learning algorithm works, you can expand the Neural Networks section below. This is optional and not required to finish the project.
Optional: Neural Networks
At a basic level, a neural networks tries to approximate a (non-linear) function that maps your input into a desired output. A basic neuron consists of a weighted linear combination of the input, followed by a non-linearity -- for example, a threshold. Consider the following neuron, which implements the logical AND operation:
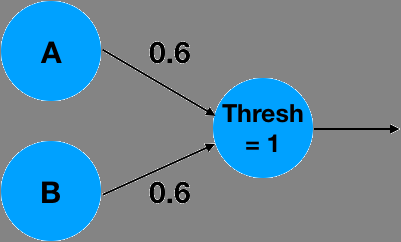
It is easy to see that for A=0, B=0, the linear combination 0*0.6 + 0*0.6 = 0, which is less than the threshold of 1 and will result in a 0 output. With an input A=0, B=1 or A=1, B=0 the linear combination will results in 1*0.6 + 0*0.6 = 0.6, which is less than 1 and result in a 0 output. Similarly, A=1, B=1 will result in 1*0.6+1*0.6=1.2, which is greater than the threshold and will result in a 1 output! What is interesting is that the simple neuron operation can also be described as an inner product between the vector [A,B]^T and the weights vector [0.6,0.6]^T followed by as thresholding, non-linear operation.
More complex functions can not be described by a simple neuron alone. We can extend the system into a network of neurons, in order to approximate the complex functions. For example, the following 2 layer network approximates the logical function XOR:
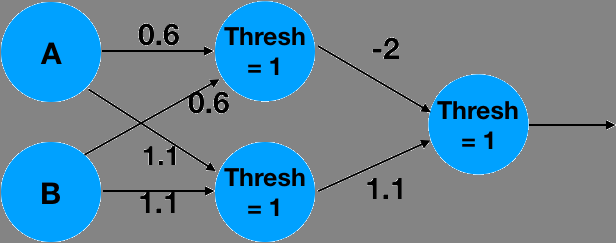
The above is a 2 layer network. The network takes 2 inputs, computes 2 intermediate values, and finally computes a single final output.
It can be written as matrix multiplications with matrices m_0 and m_1 with thresholding operations in between as shown below:
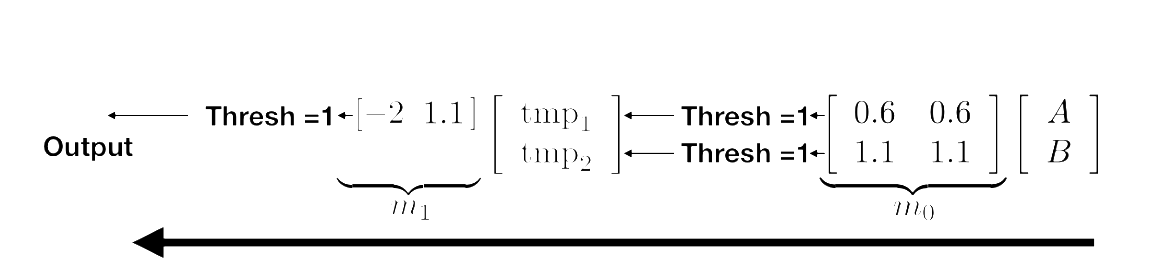
Convince yourself that this implements an XOR for the appropriate inputs!
You are probably wondering how the weights of the network were determined? This is beyond the scope of this project, and we would encourage you to take advanced classes in numerical linear algebra, signal processing, machine learning and optimization. We will only say that the weights can be trained by giving the network pairs of correct inputs and outputs and changing the weights such that the error between the outputs of the network and the correct outputs is minimized. Learning the weights is called: "Training". Using the weights on inputs is called "Inference". We will only perform inference, and you will be given weights that were pre-trained by your dedicated TA's.
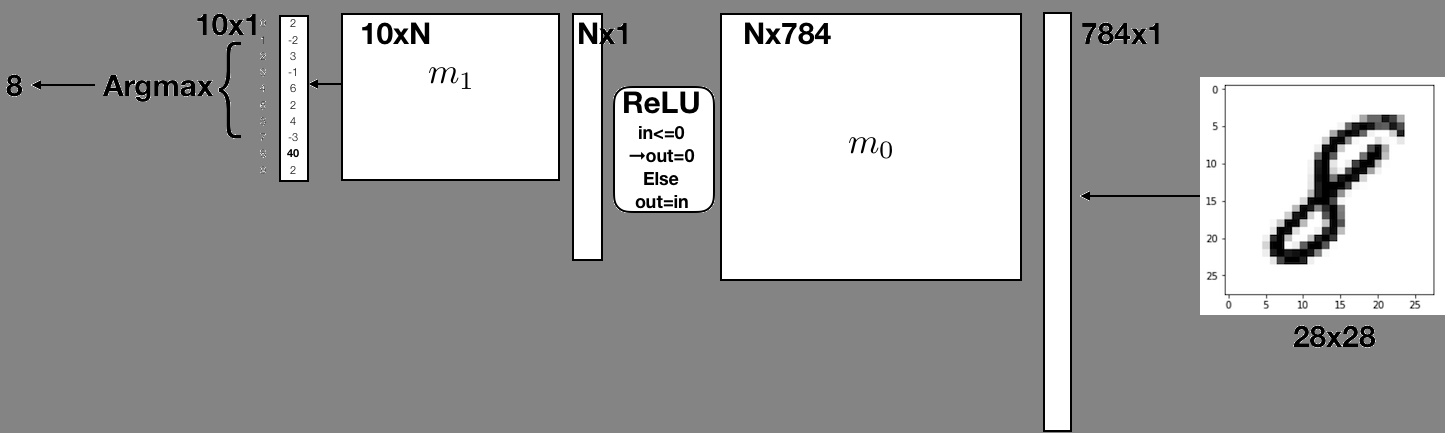
In this project we will implement a similar, but slightly more complex network which is able to classify handwritten digits. As inputs, we will use the MNIST data set, which is a dataset of 60,000 28x28 images containing handwritten digits ranging from 0-9. We will treat these images as "flattened" input vectors of size 784 (= 28 * 28). In a similar way to the example before, we will perform matrix multiplications with pre-trained weight matrices m_0 and m_1. Instead of thresholding we will use two different non-linearities: The ReLU and ArgMax functions. Details will be provided in descriptions of the individual tasks.
Conceptual Overview: Storing Matrices
A matrix is a 2-dimensional array of integers. In this project, matrices will be stored as an integer array in row-major order. Row-major order means we store each row of the matrix consecutively in memory as a 1-dimensional integer array.

Conceptual Overview: Matrix Multiplication
The matrix multiplication function takes in two integer matrices A (dimension n × m) and B (dimension m × k) and outputs an integer matrix C (dimension n × k).
To calculate the entry at row i, column j of C, take the dot product of the ith row of A and the jth column of B. Note that this can be done by calling the dot function with the proper strides.

For example, in the above diagram, we are computing the entry in row 1, column 1 of C by taking the dot product of the 1st row of A and the 1st row of B.

In the above diagram, we are computing the entry in row 2, column 2 of C. Note that we are changing the pointer to the start of the array in order to access later rows and columns.
Your Task
Fill in the matmul function in src/matmul.s.
matmul: Task 6. |
|||
| Arguments | a0 |
int * |
A pointer to the start of the first matrix A (stored as an integer array in row-major order). |
a1 |
int |
The number of rows (height) of the first matrix A. | |
a2 |
int |
The number of columns (width) of the first matrix A. | |
a3 |
int * |
A pointer to the start of the second matrix B (stored as an integer array in row-major order). | |
a4 |
int |
The number of rows (height) of the second matrix B. | |
a5 |
int |
The number of columns (width) of the second matrix B. | |
a6 |
int * |
A pointer to the start of an integer array where the result C should be stored. You can assume this memory has been allocated (but is uninitialized) and has enough space to store C. | |
| Return values | None | ||
If the input is malformed in the following ways, put the appropriate return code into a0 and run j exit to quit the program.
| Return code | Exception |
| 38 | The height or width of either matrix is less than 1. |
| 38 | The number of columns (width) of the first matrix A is not equal to the number of rows (height) of the second matrix B. |
Testing and debugging
To test your function, in your local terminal, run bash test.sh test_matmul.
To debug your function, in your Venus terminal, run cd /vmfs/test-src, then run a VDB command to start the debugger:
vdb test_matmul_length_1.s
vdb test_matmul_negative_dim_m0_x.s
vdb test_matmul_negative_dim_m0_y.s
vdb test_matmul_negative_dim_m1_x.s
vdb test_matmul_negative_dim_m1_y.s
vdb test_matmul_nonsquare_1.s
vdb test_matmul_nonsquare_2.s
vdb test_matmul_square.s
vdb test_matmul_unmatched_dims.s
vdb test_matmul_zero_dim_m0.s
vdb test_matmul_zero_dim_m1.s
Note: The error cases will not error on Venus and will only error when running the tests via bash test.sh.
Debugging advice:
- Since you'll need to call the
dotfunction inmatmul, make sure to follow calling convention! See the calling convention appendix for more details. In particular, as soon as you calldot, thedotfunction is allowed to change all the t0-t6 and a1-a7 registers, so when thedotfunction returns, you need to assume that those registers contain garbage. - You can use the functions described in the calling convention appendix to debug calling convention errors.
- Watch the debugging videos!
Task 7: Read Matrix
Conceptual Overview: Matrix Files
Remember from Task 6 that matrices are stored in memory as an integer array in row-major order.
Matrices are stored in files as a consecutive sequence of 4-byte integers. The first and second integers in the file indicate the number of rows and columns in the matrix, respectively. The rest of the integers store the elements in the matrix in row-major order.
All the matrix files end in a .bin file extension and are in the tests folder. To view matrix files, you can run xxd -e matrix_file.bin, replacing matrix_file.bin with the matrix file you want to read.
Reading matrix files
In your local terminal (not the Venus) terminal, navigate to the tests folder (e.g. cd tests), then navigate to the folder that contains the files you want to read. In this example, we'll cd read-matrix-1 to check the first test.
ls to see the files in this directory. There should be one file, input.bin. Run xxd -e input.bin to see the contents of this file. The output should look something like this:
00000000: 00000003 00000003 00000001 00000002  ................
00000010: 00000003 00000004 00000005 00000006  ................
00000020: 00000007 00000008 00000009           ............
The left-most column indexes the bytes in the file (e.g. the third row starts at the 0x20th byte of the file). The dots on the right display the bytes in the file as ASCII, but these bytes don't correspond to printable ASCII characters so only dot placeholders appear.
The actual contents of the file are listed in 4-byte blocks, 4 per row. The first row has the numbers 3 (row count), 3 (column count), 1 (first element), and 2 (second element). This is a 3x3 matrix with elements [1, 2, 3, 4, 5, 6, 7, 8, 9].
Your Task
Fill in the read_matrix function in src/read_matrix.s. This function should do the following:
- Open the file with read permissions. The filepath is provided as an argument (
a0). - Read the number of rows and columns from the file (remember: these are the first two integers in the file). Store these integers in memory at the provided pointers (
a1for rows anda2for columns). - Allocate space on the heap to store the matrix. (Hint: Use the number of rows and columns from the previous step to determine how much space to allocate.)
- Read the matrix from the file to the memory allocated in the previous step.
- Close the file.
- Return a pointer to the matrix in memory.
read_matrix: Task 7. |
|||
| Arguments | a0 |
char * |
A pointer to the filename string. |
a1 |
int * |
A pointer to an integer which will contain the number of rows. You can assume this points to allocated memory. | |
a2 |
int * |
A pointer to an integer which will contain the number of columns. You can assume this points to allocated memory. | |
| Return values | a0 |
int * |
A pointer to the matrix in memory. |
If the input is malformed in the following ways, put the appropriate return code into a0 and run j exit to quit the program.
| Return code | Exception |
| 26 | malloc returns an error. |
| 27 | fopen returns an error. |
| 28 | fclose returns an error. |
| 29 | fread does not read the correct number of bytes. |
To implement this function, you will need to call some utility functions. A complete set of function definitions can be found in the appendix. The relevant function definitions for this task are provided below (expand the section to see them).
Task 7: Relevant Function Definitions
- Open the file with read permissions. The filepath is provided as an argument (
a0).
fopen: Open a file for reading or writing. |
|||
| Arguments | a0 |
char * |
A pointer to the filename string. |
a1 |
int |
Permission bits. 0 for read-only, 1 for write-only. | |
| Return values | a0 |
int |
A file descriptor. This integer can be used in other file operation functions to refer to the opened file. If opening the file failed, this value is -1. |
- Read the number of rows and columns from the file (remember: these are the first two integers in the file). Store these integers in memory at the provided pointers (
a1for rows anda2for columns).
fread: Read bytes from a file to a buffer in memory. Subsequent reads will read from later parts of the file. |
|||
| Arguments | a0 |
int |
The file descriptor of the file we want to read from, previously returned by fopen. |
a1 |
int* |
A pointer to the buffer where the read bytes will be stored. | |
a2 |
int |
The number of bytes to read from the file. | |
| Return values | a0 |
int |
The number of bytes actually read from the file. If this differs from the argument provided in a2, then we either hit the end of the file or there was an error. |
- Allocate space on the heap to store the matrix. (Hint: Use the number of rows and columns from the previous step to determine how much space to allocate.)
malloc: Allocates heap memory. |
|||
| Arguments | a0 |
int |
The size of the memory that we want to allocate (in bytes). |
| Return values | a0 |
void * |
A pointer to the allocated memory. If the allocation failed, this value is 0. |
-
Read the matrix from the file to the memory allocated in the previous step. (Use
freadfrom above.) -
Close the file.
fclose: Close a file, saving any writes we have made to the file. |
|||
| Arguments | a0 |
int |
The file descriptor of the file we want to close, previously returned by fopen. |
| Return values | a0 |
int |
0 on success, and -1 otherwise. |
- Return a pointer to the matrix in memory.
Testing and debugging
To test your function, in your local terminal, run bash test.sh test_read_matrix.
To debug your function, in your Venus terminal, run cd /vmfs/test-src, then run a VDB command to start the debugger:
vdb test_read_1.s
vdb test_read_2.s
vdb test_read_3.s
vdb test_read_fail_fclose.s
vdb test_read_fail_fopen.s
vdb test_read_fail_fread.s
vdb test_read_fail_malloc.s
Note: The error cases will not error on Venus and will only error when running the tests via bash test.sh.
As a reminder, you can use the functions described in the calling convention appendix to debug calling convention errors. We also have debugging videos that may help you debug these errors.
Task 8: Write Matrix
Fill in the write_matrix function in src/write_matrix.s. This function should do the following:
- Open the file with write permissions. The filepath is provided as an argument.
- Write the number of rows and columns to the file. (Hint: The
fwritefunction expects a pointer to data in memory, so you should first store the data to memory, and then pass a pointer to the data tofwrite.) - Write the data to the file.
- Close the file.
write_matrix: Task 8. |
|||
| Arguments | a0 |
char * |
A pointer to the filename string. |
a1 |
int * |
A pointer to the matrix in memory (stored as an integer array). | |
a2 |
int |
The number of rows in the matrix. | |
a3 |
int |
The number of columns in the matrix. | |
| Return values | None | ||
If the input is malformed in the following ways, put the appropriate return code into a0 and run j exit to quit the program.
| Return code | Exception |
| 27 | fopen returns an error. |
| 30 | fwrite does not write the correct number of bytes. |
| 28 | fclose returns an error. |
To implement this function, you will need to call some utility functions. A complete set of function definitions can be found in the appendix. The relevant function definitions for this task are provided below (expand the section to see them).
Task 8: Relevant Function Definitions
- Open the file with write permissions. The filepath is provided as an argument.
fopen: Open a file for reading or writing. |
|||
| Arguments | a0 |
char * |
A pointer to the filename string. |
a1 |
int |
Permission bits. 0 for read-only, 1 for write-only. | |
| Return values | a0 |
int |
A file descriptor. This integer can be used in other file operation functions to refer to the opened file. If opening the file failed, this value is -1. |
-
Write the number of rows and columns to the file. (Hint: The
fwritefunction expects a pointer to data in memory, so you should first store the data to memory, and then pass a pointer to the data tofwrite.) -
Write the data to the file.
fwrite: Write bytes from a buffer in memory to a file. Subsequent writes append to the end of the existing file. |
|||
| Arguments | a0 |
int |
The file descriptor of the file we want to write to, previously returned by fopen. |
a1 |
void * |
A pointer to a buffer containing what we want to write to the file. | |
a2 |
int |
The number of elements to write to the file. | |
a3 |
int |
The size of each element. In total, a2 × a3 bytes are written. |
|
| Return values | a0 |
int |
The number of items actually written to the file. If this differs from the number of items specified (a2), then we either hit the end of the file or there was an error. |
- Close the file.
fclose: Close a file, saving any writes we have made to the file. |
|||
| Arguments | a0 |
int |
The file descriptor of the file we want to close, previously returned by fopen. |
| Return values | a0 |
int |
0 on success, and -1 otherwise. |
Testing and debugging
To test your function, in your local terminal, run bash test.sh test_write_matrix.
To debug your function, in your Venus terminal, run cd /vmfs/test-src, then run a VDB command to start the debugger:
vdb test_write_1.s
vdb test_write_fail_fclose.s
vdb test_write_fail_fopen.s
vdb test_write_fail_fwrite.s
Note: The error cases will not error on Venus and will only error when running the tests via bash test.sh.
As a reminder, you can use the functions described in the calling convention appendix to debug calling convention errors. We also have debugging videos that may help you debug these errors.
Task 9: Classify
Recall the neural net that we're trying to create. In this task, you will use functions from the previous tasks in order to complete the classification function, located in src/classify.s.
Fill in the classify function in src/classify.s. This function should do the following:
- Read three matrices
m0,m1, andinputfrom files. Their filepaths are provided as arguments. You will need to allocate space for the pointer arguments toread_matrix, since that function is expecting a pointer to allocated memory. - Compute
h = matmul(m0, input). You will probably need tomallocspace to fith. - Compute
h = relu(h). Remember thatreluis performed in-place. - Compute
o = matmul(m1, h)and write the resulting matrix to theoutputfile. Theoutputfilepath is provided as an argument. - Compute and return
argmax(o). If the print argument is set to 0, then also print outargmax(o)and a newline character. - Free any data you allocated with
malloc. This includes any heap blocks allocated from callingread_matrix. - Remember to put the return value,
argmax(o), in the appropriate register before returning.
classify: Task 9. |
|||
| Arguments | a0 |
int |
argc (the number of arguments provided) |
a1 |
char ** |
argv, a pointer to an array of argument strings (char *) |
|
a1[1] = *(a1 + 4) |
char * |
A pointer to the filepath string of the first matrix file m0. |
|
a1[2] = *(a1 + 8) |
char * |
A pointer to the filepath string of the second matrix file m1. |
|
a1[3] = *(a1 + 12) |
char * |
A pointer to the filepath string of the input matrix file input. |
|
a1[4] = *(a1 + 16) |
char * |
A pointer to the filepath string of the output file. | |
a2 |
int |
If set to 0, print out the classification. Otherwise, do not print anything. | |
| Return values | a0 |
int |
The classification (see above). |
If the input is malformed in the following ways, put the appropriate return code into a0 and run j exit to quit the program.
| Return code | Exception |
| 26 | malloc returns an error. |
| 31 | There are an incorrect number of command line arguments. Note that there are 5 arguments to the program, because a1[0] is reserved for the name of the program. |
To implement this function, you will need to call some utility functions. A complete set of function definitions can be found in the appendix. The relevant function definitions for this task are provided below (expand the section to see them).
Task 9: Relevant Function Definitions
- Read three matrices
m0,m1, andinputfrom files. Their filepaths are provided as arguments. You will need to allocate space for the pointer arguments toread_matrix, since that function is expecting a pointer to allocated memory.
read_matrix: Task 7. |
|||
| Arguments | a0 |
char * |
A pointer to the filename string. |
a1 |
int * |
A pointer to an integer which will contain the number of rows. You can assume this points to allocated memory. | |
a2 |
int * |
A pointer to an integer which will contain the number of columns. You can assume this points to allocated memory. | |
| Return values | a0 |
int * |
A pointer to the matrix in memory. |
- Compute
h = matmul(m0, input). You will probably need tomallocspace to fith.
malloc: Allocates heap memory. |
|||
| Arguments | a0 |
int |
The size of the memory that we want to allocate (in bytes). |
| Return values | a0 |
void * |
A pointer to the allocated memory. If the allocation failed, this value is 0. |
matmul: Task 6. |
|||
| Arguments | a0 |
int * |
A pointer to the start of the first matrix A (stored as an integer array in row-major order). |
a1 |
int |
The number of rows (height) of the first matrix A. | |
a2 |
int |
The number of columns (width) of the first matrix A. | |
a3 |
int * |
A pointer to the start of the second matrix B (stored as an integer array in row-major order). | |
a4 |
int |
The number of rows (height) of the second matrix B. | |
a5 |
int |
The number of columns (width) of the second matrix B. | |
a6 |
int * |
A pointer to the start of an integer array where the result C should be stored. You can assume this memory has been allocated (but is uninitialized) and has enough space to store C. | |
| Return values | None | ||
- Compute
h = relu(h). Remember thatreluis performed in-place.
relu: Task 2. |
|||
| Arguments | a0 |
int * |
A pointer to the start of the integer array. |
a1 |
int |
The number of integers in the array. You can assume that this argument matches the actual length of the integer array. | |
| Return values | None | ||
- Compute
o = matmul(m1, h)and write the resulting matrix to theoutputfile. Theoutputfilepath is provided as an argument.
write_matrix: Task 8. |
|||
| Arguments | a0 |
char * |
A pointer to the filename string. |
a1 |
int * |
A pointer to the matrix in memory (stored as an integer array). | |
a2 |
int |
The number of rows in the matrix. | |
a3 |
int |
The number of columns in the matrix. | |
| Return values | None | ||
- Compute and return
argmax(o). If the print argument is set to 0, then also print outargmax(o)and a newline character.
argmax: Task 3. |
|||
| Arguments | a0 |
int * |
A pointer to the start of the integer array. |
a1 |
int |
The number of integers in the array. You can assume that this argument matches the actual length of the integer array. | |
| Return values | a0 |
int |
The index of the largest element. If the largest element appears multiple times, return the smallest index. |
print_int: Prints an integer. |
|||
| Arguments | a0 |
int |
The integer to print. |
| Return values | None | ||
print_char: Prints a character. |
|||
| Arguments | a0 |
char |
The character to print. You can provide the ASCII code or put the character directly in the register like li t0 '\n'. |
| Return values | None | ||
- Free any data you allocated with
malloc. This includes any heap blocks allocated from callingread_matrix.
free: Frees heap memory. |
|||
| Arguments | a0 |
void * |
A pointer to the allocated memory to be freed. |
| Return values | None | ||
- Remember to put the return value,
argmax(o), in the appropriate register before returning.
Testing and debugging
To test your function, in your local terminal, run bash test.sh test_classify.
To debug your function, in your Venus terminal, run cd /vmfs/test-src, then run a VDB command to start the debugger:
vdb test_classify_1_silent.s ../tests/classify-1/m0.bin ../tests/classify-1/m1.bin ../tests/classify-1/input.bin ../tests/classify-1/output.bin
vdb test_classify_2_print.s ../tests/classify-2/m0.bin ../tests/classify-2/m1.bin ../tests/classify-2/input.bin ../tests/classify-2/output.bin
vdb test_classify_3_print.s ../tests/classify-3/m0.bin ../tests/classify-3/m1.bin ../tests/classify-3/input.bin ../tests/classify-3/output.bin
vdb test_classify_fail_malloc.s ../tests/classify-1/m0.bin ../tests/classify-1/m1.bin ../tests/classify-1/input.bin ../tests/classify-1/output.bin
vdb test_classify_not_enough_args.s
Note: The error cases will not error on Venus and will only error when running the tests via bash test.sh.
Once you have classify running, you can run bash test.sh test_chain. This runs your classification function twice to make sure you properly followed calling convention.
As a reminder, you can use the functions described in the calling convention appendix to debug calling convention errors. We also have debugging videos that may help you debug these errors.
To debug the chain test, run cd /vmfs/test-src, then run a VDB command to start the debugger:
vdb ../tests/chain-1/chain.s
Task 10: Partner/Feedback Form
Congratulations on finishing the project! We'd love to hear your feedback on what can be improved for future semesters.
Please fill out this short form, where you can offer your thoughts on the project and (if applicable) your partnership. Any feedback you provide won't affect your grade, so feel free to be honest and constructive.
Submission and Grading
Submit your code to the Project 2 assignment on Gradescope.
To ensure the autograder runs correctly, do not add any .import statements to the starter code. Also, make sure there are no ecall instructions in your code.